Shanel Wu
They/them. PhD student: smart textiles, weaving, computational craft, hardware hacking.
Loom Pedals V2
Fall 2021 / Spring 2022
Project Overview
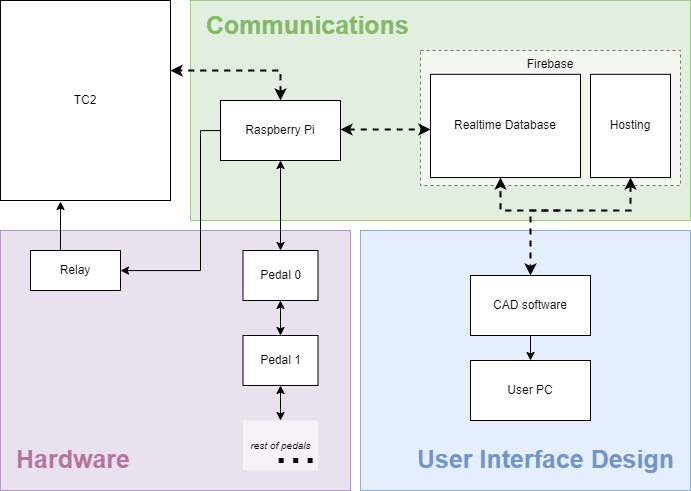
The Loom Pedals are a hardware peripheral interface for the TC2 digital Jacquard loom by Tronrud Engineering. They have been designed as a modular system of foot pedals, similar to guitar effects pedals used by musicians, which are connected via a Raspberry Pi to a web-based open source weaving software, AdaCAD.
GitHub repositories
This page currently focuses on describing and documenting the Loom Pedals system as it evolves. We are also working on a developer’s guide to support any interested makers.
Table of Contents
Section A: Project Fundamentals
- Weaving, Jacquard looms, and TC2 basics
- Dependencies
- Installation and assembly
- Prerequisite skills for developers
- Open source disclosure (?)
- Overview
- Hardware
- Circuit design
- Enclosure design
- Driver software
- File organization
- Physical pedals
- Virtual pedals
- TC2 connection (not yet public)
- Database connection
- AdaCAD integration
- Services
- Component
Section C: Current and Future Work
- Refactoring operations in AdaCAD
- Physical enclosure improvements/alternate form factors
- Adding analog inputs (e.g. dials, sliders)
- Experimenting with output display: thermal printer
Previous Version
V1 of the loom pedals was built in Fall 2019 by reimplementing Processing (Java) code from Lea (see acknowledgments) in Python/QT as a proof-of-concept for an improved GUI with multiple pedals on a Raspberry Pi.
Acknowledgments
These pedals would not have been possible without the initial work of Lea Albaugh, whose Summer 2019 experiments in underdetermined, improvisational weaving interactions on the TC2 are documented on their site here. Thank you, also, to Tronrud for engineering such a nifty Jacquard loom for experimental weaving. And finally, thank you to our lab’s loom – Jean-Luc Jacquard.
Section A: Project Fundamentals
I’m gonna force anyone engaging with this project to first learn how weaving works.
Weaving, Jacquard looms, and TC2 basics
Tronrud’s TC2 is a digital Jacquard loom. Let’s break that phrase down, starting with the “loom” part. A loom is a tool for weaving, which is a fiber craft that interlaces yarns to create cloth.
Quick disclaimer on language: there are many forms of weaving across cultures and materials, as well as a few different ways to define “yarn” or “fabric” or “cloth” or any other craft-related term. With things that have evolved through so much history that they are at once universal, yet diverse, there are bound to be exceptions or special cases of definitions. I’ll be generalizing the most common forms of weaving in my experience, which may be western-/Euro-centric because I learned to weave in an English-speaking, American, digital setting – not coincidentally, this type of weaving is also the most prevalent in industrial textiles.
Woven structures
[citations to craft books throughout]
Weaving mainly interlaces two sets of yarn in perpendicular directions. Conventionally, if we take one set to be vertical and one to be horizontal, the vertical set of yarns is called the “warp” and the horizontal set is the “weft”. (A catchy saying is “weft goes from left to right”) [source?] On many looms, the warp is tilted away from the weaver, or lying flat, so the “vertical” direction is rather towards/away from the weaver rather than up/down. The warp is first set up on the loom (“warping” the loom). Then, the weft is inserted perpendicular to the warp, travelling over and under to form a row of weaving.
[take photos of cloth]
There are many different ways to weave these sequences of overs-and-unders and thus achieve a variety of patterns and structures in the cloth. The simplest structure is plainweave, also called “tabby”. To make plainweave, the weft first goes over one warp, under one warp, over one, under one, alternating over and under through the whole row. In the next row, the weft will go underneath a warp if it had gone over in the previous row, and over a warp if it had gone under previously. The weaver alternates between these two rows as many times as needed. You can imagine that if the weft “goes over two, under one” or any other pattern of overs-and-unders, the weaving would produce a different structure.
We can represent these patterns as drafts, a standard grid-based notation for woven structures. In a draft, a white square represents where the weft is over the warp, while a black square represents where the warp is on top. So a row of squares represents a single pass of the weft, while a column represents how an individual warp behaves during weaving.
Looms: Jacquard, frame, and other types
I didn’t mention what tools were used to make the woven structures in the last section, because many types of looms can be used to achieve the same structure. [cite Albers] To build up to what a “Jacquard” loom is, we can start with the most fundamental loom, which is a rectangular frame that holds the warp yarns in parallel. If you’re following along anyway, go grab a picture frame/hardcover book/two ladder rungs and wrap some yarn around the item, leaving some space between each wrap. Bam, loom.

To weave, you can use a needle to manually go over and under the warps, or simply manipulate the weft with your fingers. Many tapestry looms (see photos) [add photos] simply use these components.
We can make weaving on our loom faster by adding a way to lift multiple warps at a time, e.g. by tying loops around each set of yarns that would lift in one row of the pattern, then tying these loops to a single rod, we can lift all of the yarns that the weft should go under in that row. A shed is the gap that forms between the raised warps and lower warps. These loops that raise and lower warp yarns are heddles, which can be made of wire, string, or cut out of wood. A set of heddles that lift together form a frame or shaft, as they are all attached to a common part.

Since each heddle can only be attached to one shaft, a loom with multiple shafts will create a different shed for each one lifted. Most of these looms are categorized as frame looms (see photos), typically found in 2-shaft, 4-shaft, 8-shaft, and 16-shaft configurations. Drafts for frame looms will have a separate section, the threading, that indicates which shaft each warp is threaded on.
[photos of real looms]
As an aside, I shouldn’t ignore heddles on other types of looms, as these variations show how useful the mechanism is. The illustrated heddle shaft most closely resembles a set of string heddles on backstrap looms. [photos]
However, cloth woven on a shaft loom will usually make use of patterns that are much more varied than the number of shafts. How can we accomplish this complexity? By lifting multiple shafts at a time. Imagine that our loom’s shaft now have ropes attached to the top, so we can raise them by tugging on the rope. If we hold the ropes from multiple shafts, all of those shafts will lift when we pull. With some clever engineering, we route these ropes down to the floor and attach them to a foot pedal that acts as a lever. We have just built a treadle.

In the configuration described thus far, the threading is more or less fixed on the loom, until the weaver uses up all the warp and rethreads. It would be pretty troublesome to move warps between shafts, unless you hack up the heddles so they’re transferable. However, unlike the heddles and threading, the shafts and treadles are easily reconfigured by changing which shafts are tied to a particular treadle. Fittingly, the combinations of shafts that are controlled by each treadle is called the tie-up, which is also a section of a frame loom draft.
You’ll notice that the frame looms displayed above each have an array of treadles. Each treadle can open a different shed according to the tie-up, and the weaver can now achieve a pattern by following a sequence of treadle steps – the treadling for the draft. This represents the final section we need to complete the four-section draft of a frame loom. For completion’s sake, the first section of the draft that we discussed above is the drawdown. [add example draft]
Alright, we’ve built all the mechanisms for a frame loom, and this level of complexity has been sufficient for much of weaving history. One threading can produce many different patterns, as we can easily change the tie-up and treadling sequence. Today, many handweavers work with 4-shaft, 6-treadle frame looms, as they already offer a large selection of possible designs without overwhelming the weaver with complex mechanics. Yet some people still needed finer control to make more complex, figured designs. Enter the Jacquard loom.
A Jacquard loom is the result of replacing the shafts of a loom with a mechanism that can control each heddle individually, rather than lifting warps in fixed sets. Effectively, this is like putting each warp on its own shaft – that would be an absolutely abominable machine, so good thing Mr. Joseph Marie Jacquard came up with this new way of automating warp control. Instead of tie-ups and treadling, Jacquard looms create patterns using punch cards, where the drawdown of the draft is directly encoded in a series of punched holes. Each row of holes corresponds to a row in the draft. In a simplified representation of the Jacquard mechanism, we will assume that holes correspond to black squares on a draft, while spaces with no hole (solid card) correspond to a white square.
The Thread Controller 2 (TC2)
The TC2, which stands for “Thread Controller 2” to appropriately set itself apart from the TC1, is a modern implementation of a Jacquard loom. In today’s terms, “Jacquard” is a category of loom, defined by having some mechanism (the Jacquard mechanism) that can control warps individually via two-dimensional binary data. The TC2 is a “digital” Jacquard loom in the sense that it uses many modern computing technologies to implement a Jacquard mechanism. Rather than a physical punch card, it reads the draft from a bitmap image file. Additionally, the TC2 receives this bitmap row-by-row via a WiFi connection hosted by another computer.
Having gone over the textile technologies that this project integrates, let’s go to the electronics and silicon-based computing tech.
Dependencies
This project uses:
- Raspberry Pi with Raspbian
- Firebase Realtime Database and Hosting
- Node.JS
- rpio
- firebase/database
- Angular.JS
Section B: System Components
Each component of the loom pedals system is in its own repository. These sections are also roughly organized in the chronological order in which I built each component.
Overview
Hardware
The loom pedals I describe represent “V2” of the system. V1 was the first time I implemented the combination of pedals, Raspberry Pi, and TC2 for a class project, which you can find [on its own project page.]
Circuit design
The pedals are designed to be modular and interchangeable, linking up in series, with the first pedal directly connected to the Pi.
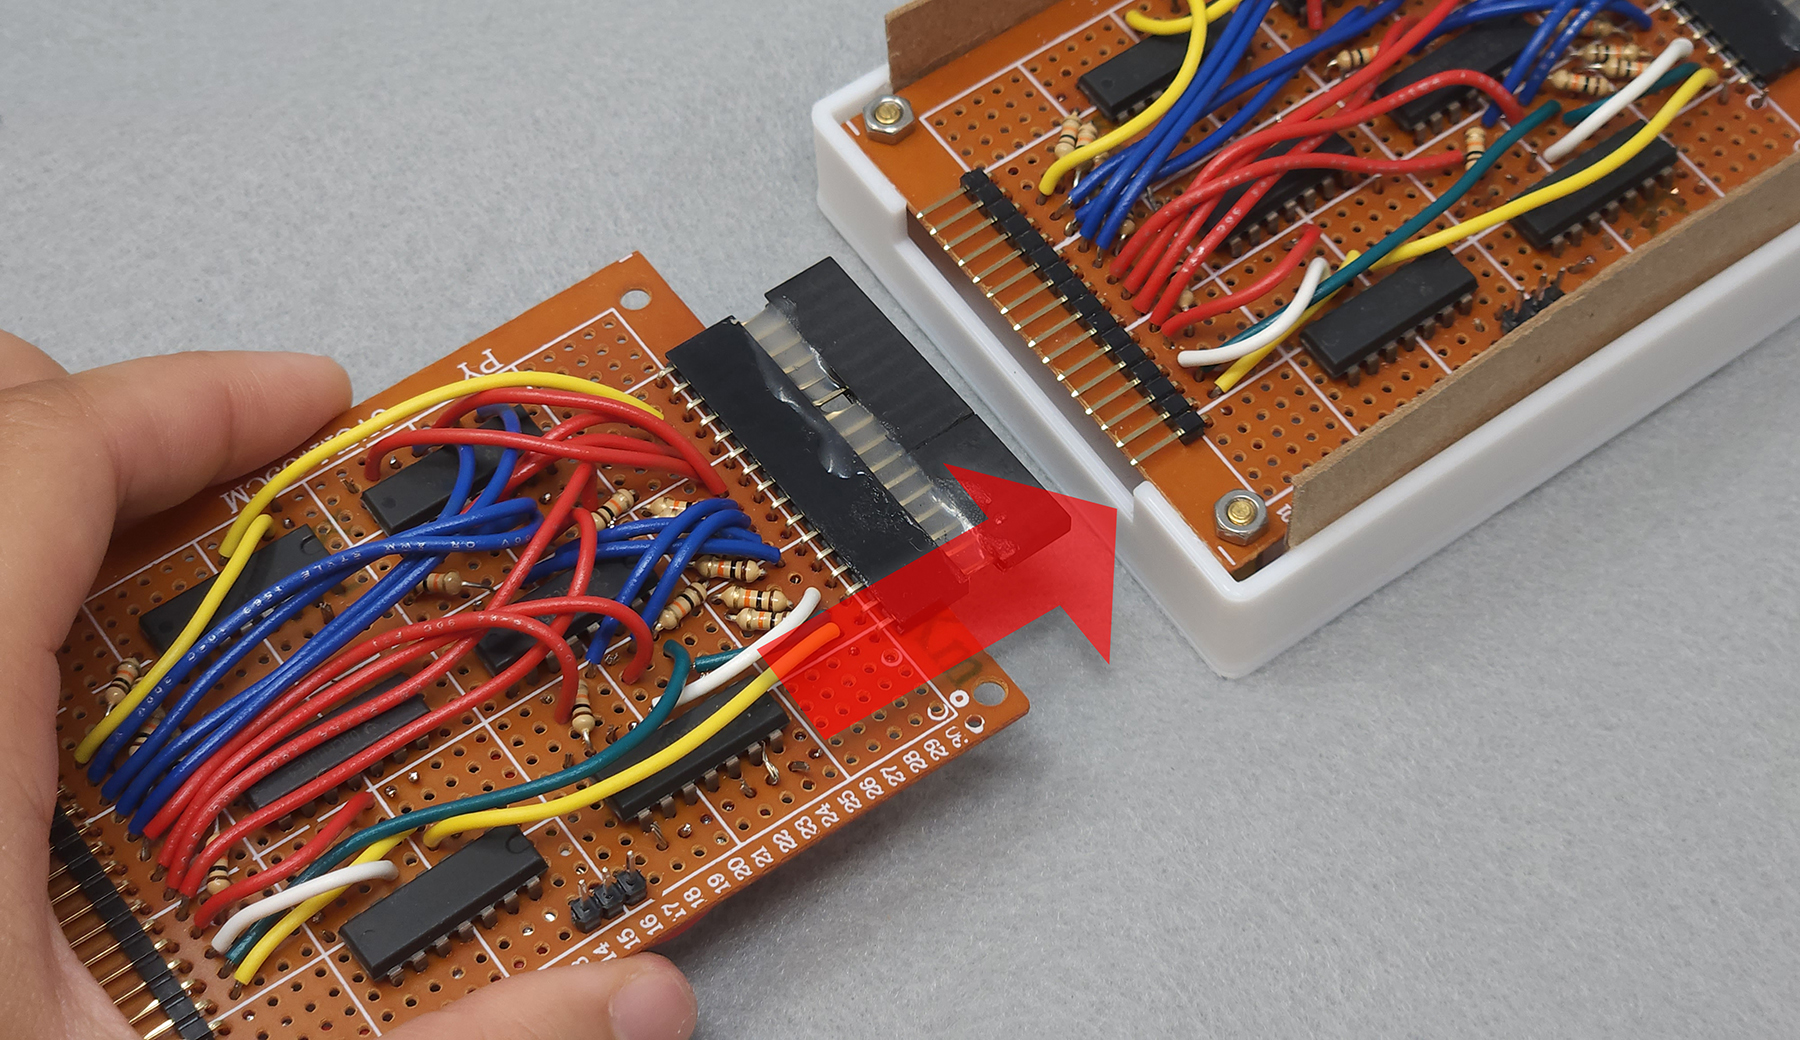

The circuitry in the pedals shown are implemented with off-the-shelf digital logic IC’s and hand-soldering to a perfboard, but a PCB is in the works, because it’s probably not good for me to inhale all of these fumes.
Enclosure design
The enclosure’s CAD files are on GitHub. Many many thanks to Lily Gabriel for modelling and 3D-printing the enclosures much faster than I would have.
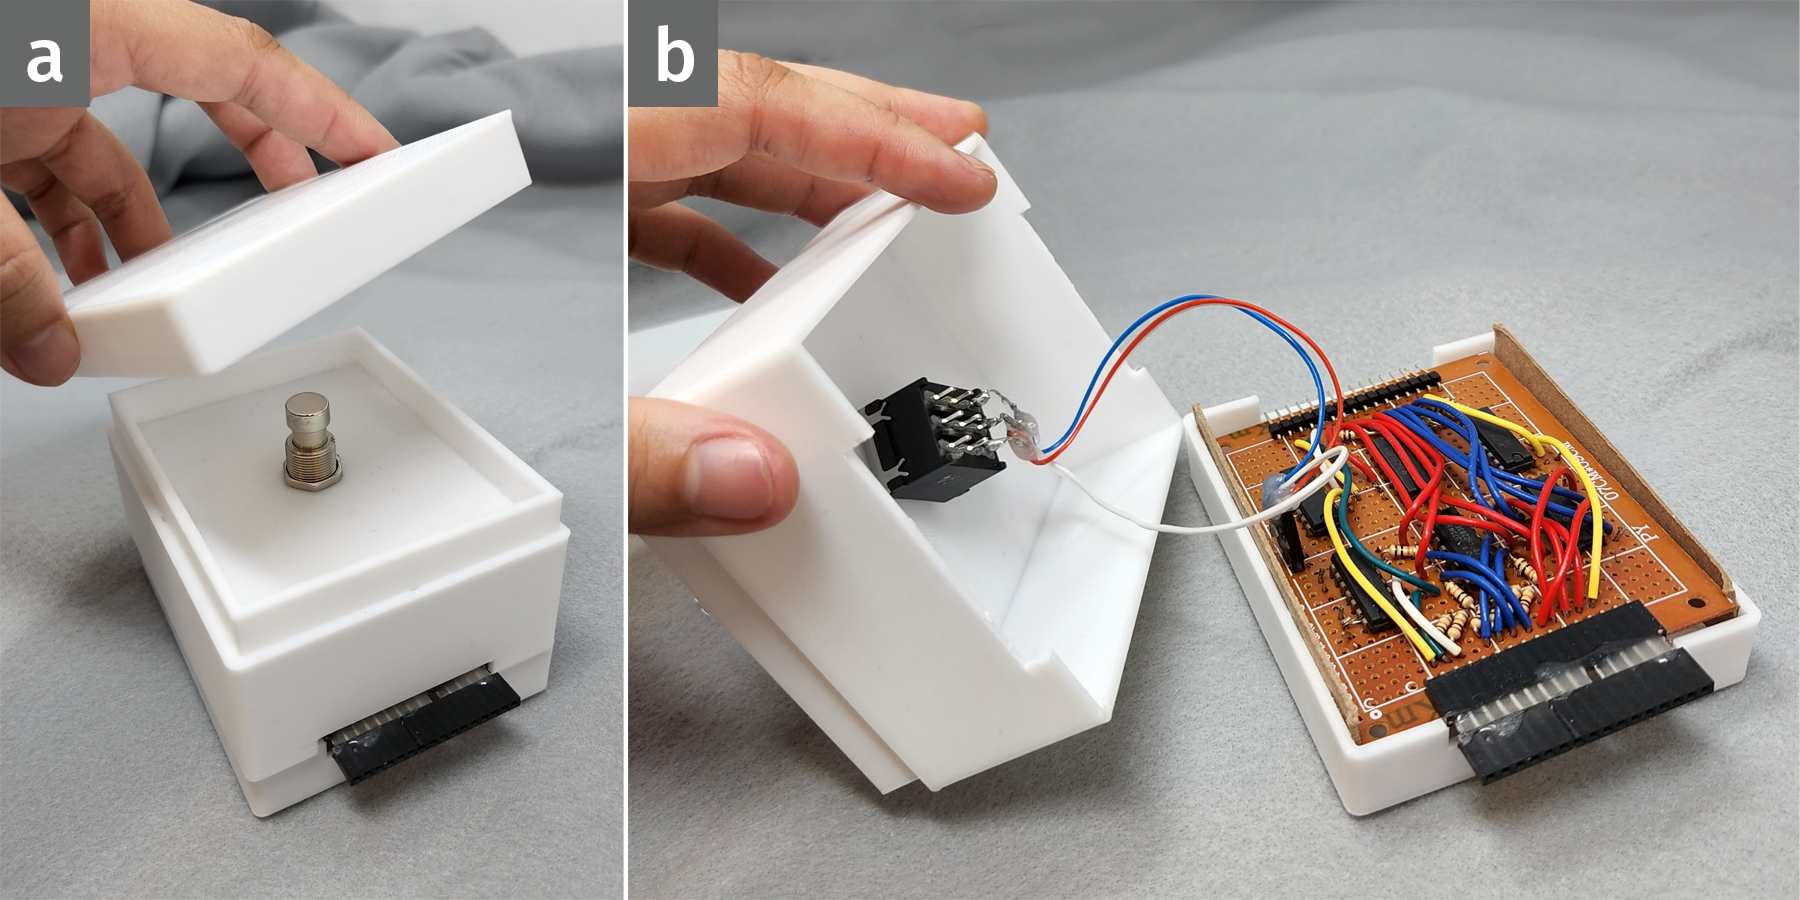
This version of the enclosure is a sort of minimum viable prototype, and it would definitely be interesting to try different form factors.
Raspberry Pi software
The Raspberry Pi serves as the system’s communication hub: it drives the pedals hardware and maintains wireless connections to both the TC2 and the cloud-based design/control software (AdaCAD). These three connections are handled by continuously running a Node.JS program while using the loom, and each connection has its own module in the program.
File organization
The repository is divided into the following sub-folders (modules).
0_main Main program
Currently, each configuration of the Loom Pedals hardware (i.e. virtual or physical pedals) must run a separate main program.
1_pedals Pedals driver
Uses the Raspberry Pi’s GPIO pins to drive the pedal devices.
2_loom TC2 connection
This module is not yet public.
3_db Database connection
Connects to a Firebase realtime database and updates it with data pertaining to the TC2, pedals, and user inputs.
Virtual pedals
The Loom Pedals system can be used without any of the aforementioned hardware (Raspberry Pi, pedal circuitry) through the virtual pedals option. These pedals are hosted within the design software.
AdaCAD integration: design software interface
See
Obsidian Links
[[a_fundamentals]] [[electronics]] [[programming]] [[projects]]
Associated Blog Posts:
- Loom Pedals V1 - Physical Design (07 Apr 2021)