Shanel Wu
They/them. PhD student: smart textiles, weaving, computational craft, hardware hacking.
Kickshaws Ankle Strap
by S
My Kickshaws samples were prone to falling down the back of the foot, which I see as a major design flaw. In the interest of not beating myself up for releasing a pattern that I feel isn’t “good enough” (and feeling guilty for that), here’s a fix that I’ve developed.
The Kickshaws are a pair of slippers or house socks that I originally designed in collaboration with Jimmy Beans Wool for one of their subscription clubs. The latest version of the pattern (without this fix) is available on my Payhip site. Let’s go straight to the bones of the pattern hack, and I’ll save my ruminating for later.
Structure/Schematic
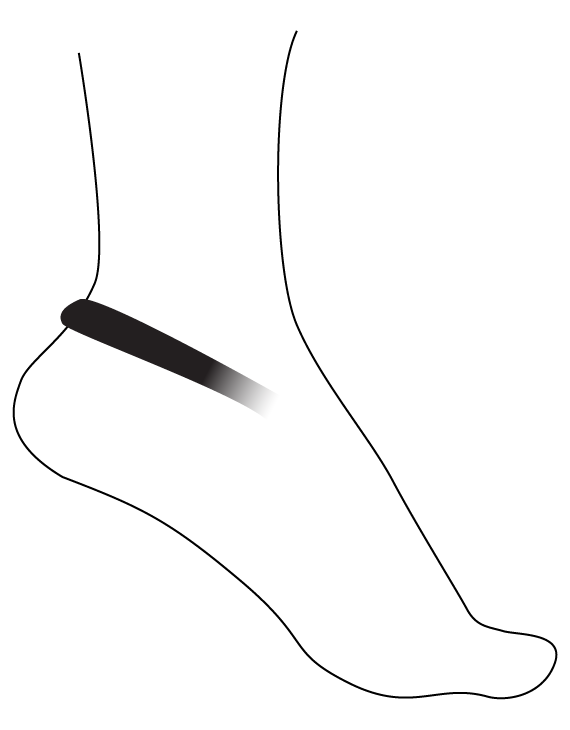
Because the back of the slipper was in garter stitch, a very stretchy stitch, the slipper would tend to be loose around the heel and it would be easily pulled down by the heel/sole seam when the wearer moves. An ankle strap adds a band of less-stretchy, higher-tension fabric right above the heel. And since most people’s heels form a flared base from the ankle, this band won’t want to slip down the heel unless there’s a much bigger force (like the wearer tugging the slipper off).

I’ve provided two different methods:
- An embedded i-cord method for any ongoing or new Kickshaws projects going forward.
- An afterthought i-cord or crochet row method for Kickshaws that are past Part 2 or already completed. Alternatively, you could make the Kickshaws as written and adjust the finished slippers with this method.
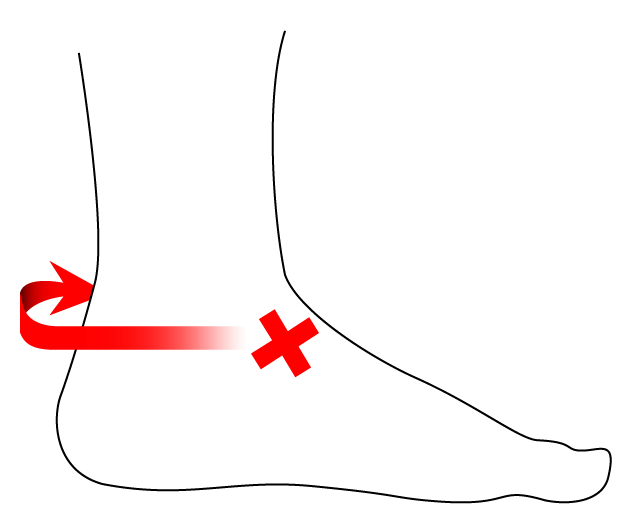
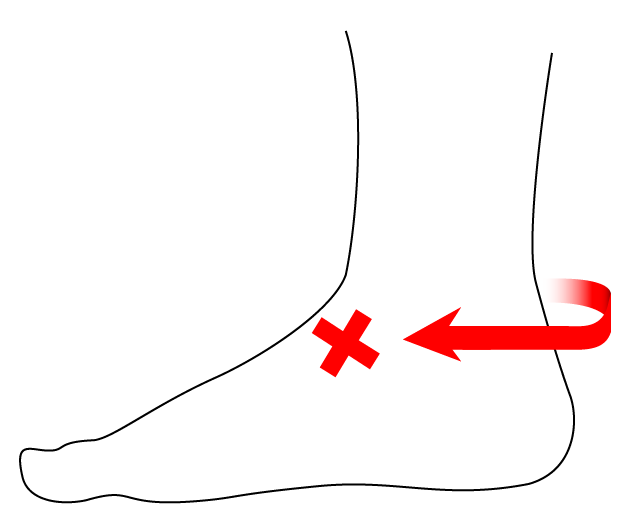
Both methods will begin on the instep near the ankle (see Diagram A below), and progress around the back of the ankle. The ankle strap ends at the point on the other side of the instep/ankle marked in Diagram B.
Diagram A

Diagram B

Instructions
Abbreviations
CO - cast on
st - stitch
RS - right side of work (outside of slipper) / WS - wrong side (inside)
MC - main color / CC - contrasting color
k - knit / p - purl
R/L needle - right/left needle
sl - slip stitch // wyif - with yarn in front / wyib - with yarn in back
pm - place stitch marker / sm - slip marker
1. Embedded I-cord Method
These instructions begin in Part 2 of the pattern and modify Rows 7-10. Work the pattern instructions, repeating Rows 7-10 as written, until the CO for additional stitches. Cast on 6 (8, 12, 14) sts as the pattern instructs to create the leg of the slipper, or however many sts are needed to create the desired leg shaft. Rather than working Rows 9-10 after the cast on, work Rows A-B once to set up the embedded i-cord.
Row A (RS, set up in CC): knit first 7 (8, 12, 14) sts, or the number of sts cast on plus one (CO + 1), then place a stitch marker. k3, pm, k to 1 st from end, sl1 wyib, pick up and knit 1 st in selvedge, psso.
Row B (WS, CC): Sl1 wyif, k to the first marker, sm, sl3 wyif, sm, k to end of row.
Substitute Rows 7-10 as they’re written in the pattern with the following modified instructions:
Row 7 (RS, MC): Sl1 wyif, k to marker, sm, k3, sm, k to 1 st from end, sl1 wyib, pick up and knit 1 st in selvedge, psso.
Row 8 (WS, MC): Sl1 wyif, p to marker, sm, sl3 wyif, sm, p to 1 st from end, k1.
Row 9 (RS, CC): Sl1 wyif, k to marker, sm, k3, sm, k to 1 st from end, sl1 wyib, pick up and knit 1 st in selvedge, psso.
Row 10 (WS, CC): Sl1 wyif, k to marker, sm, sl3 wyif, sm, k to end.
Here’s an alternate, abbreviated version of the modified instructions:
Row 7/9 (RS): work row as written until the first marker, sm, k3, sm, work to end of row.
Row 8/10 (WS): as Row 10. Work row as written until the marker, sm, sl3 wyif, sm, work to end of row.
TIP: In order for the embedded i-cord to really pop from the fabric, when working WS rows, bunch the 3 slipped sts close together on the needle and pull the next st extra tight so that the float is as short as possible.
Finish Part 2 using these modified instructions, including when you switch to the garter stitch portion of the heel (repeating only Rows 9-10). Keeping using the modified Rows 7-10 for the beginning of Part 3, until bind off the leg stitches. Resume using Rows 7-10 as written in the pattern and finish the slipper.
2. Afterthought Methods
These instructions assume that you have the slipper oriented so that the toe is pointing down and the cuff is pointing to your right. So the ankle strap should first go “up” the work to go around the back of the heel.
The fun thing about any “afterthought” technique is that you have complete freedom in what yarn you use! You can use either MC or CC for an afterthought ankle strap. Heck, you can use any other yarn at your disposal. Just keep in mind that yarns that differ greatly from the worsted-weight wool yarns you used in the rest of the slipper will give a different effect. They might stretch differently or create smaller/bigger stitches, and you might have to fiddle more with spacing out stitches/rows.
2.1 Afterthought I-cord
Use the same needle size you used to knit the slippers. Beginning at the point marked with a red “X” in Diagram A, use your R needle to pick up and knit three sts in a garter ridge. Slip all three sts to your L needle (or if you’re using DPN’s, just slide them over) with the yarn in back.
Repeat the following two rows to work an attached i-cord:
I-cord Row 1: Pick up (without knitting) the stitch above the previous row, in the next garter ridge. Slip this stitch onto the L needle. K2tog. You should still have 3 stitches on the needle. K2, slip 3 to L needle wyib.
I-cord Row 2: K3, slip 3 to L needle wyib.
Continue around the heel until you reach the ending point marked with a red “X” in Diagram B. Cut your yarn, leaving a 6”/15cm tail. Use the tail to sew the three i-cord stitches to the next garter ridge on the slipper.
2.2 Afterthought Crochet Row
Disclaimer: I still haven’t written a crochet pattern before, and don’t consider myself rigorous enough to be a crochet “designer”, so instructions on gauge/tension and hook size may be wishy-washy. I use American crochet terms (UK equivalent in parentheses).
Use a crochet hook equivalent to the needle size you used to knit the slippers. If you’re an especially tight or loose crocheter, you may need to size up or down accordingly. Beginning at the point marked with a red “X” in Diagram A, insert your hook into the purl bump of the garter ridge. Make a single crochet (UK: double crochet) stitch.
Move to the next garter ridge and the stitch right above the one you just crocheted into. Make another single (double) crochet stitch. Continue around the heel until you reach the ending point marked with a red “X” in Diagram B.