Shanel Wu
They/them. PhD student: smart textiles, weaving, computational craft, hardware hacking.
Zoom Loom Button
by Shanel
I made this button way back, probably in February or March, so that I would have a portable smart textile component to bring to my studio class. This is the same button that was used in the Bluetooth-Fabric Controller project.
Materials
- MAIN: DK or worsted weight yarn (wool or acrylic preferable)
- SUPP: Conductive stainless steel yarn
Tools/Equipment
- Pin loom (or other weaving loom)
- Tapestry needle
- Crimper
- Soldering iron
Functional Overview
Weaving makes a fabric by interlacing two perpendicular sets of yarn, the warp (conventionally vertical) and the weft (horizontal). The warp is first set up on the loom (“warping” the loom) and held under tension. Then, the weft is passed across the warp yarns, going over and under periodically, to interlace and form the fabric structure. One particular woven structure, doubleweave, actually forms two separate layers during the weaving. Using this structure in a specific area can create a pocket in that area, as shown in the drawing below.
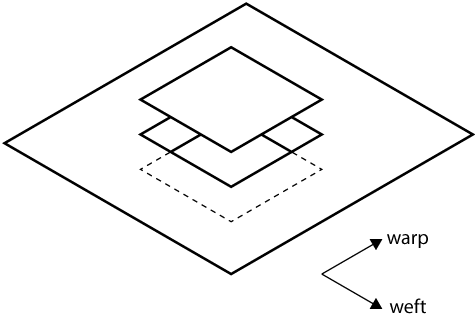
Drawing of the base structure of the woven button. The button itself is made of a two-layered woven structure, bound together by the ground plane of the surrounding fabric.
During the weaving process, we can add in a “supplemental” yarn that follows the base yarn to “supplement” the structure in selected portions. This yarn can be in either direction, making supplemental warp or supplemental weft. The supplemental yarn does not have to be as sturdy as the base yarn in the rest of the fabric, giving us a way to easily use fragile conductive yarn. On this button, I used stainless steel conductive yarn as supplemental warp to cover the top face of the button and form one terminal. Supplemental weft using the same yarn formed the bottom face of the button, the other terminal. I stuffed the pocket with scraps of yarn to separate the terminals.
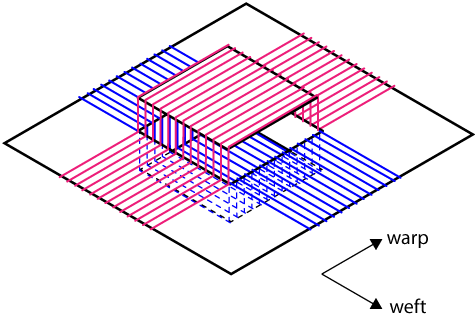
Drawing of the button showing the location of supplemental warp (pink) and supplemental weft (blue).
Instructions
Warping the pin loom
- Use the MAIN yarn for the warp. Holding two strands together, start yarn in bottom-left corner and wind the yarn vertically back-and-forth like in this pin loom guide, but stop after step 7.
- Take the yarn straight down along the pins on the side, and then around the bottom-right corner as shown in the picture below. The yarn is now heading vertically up across the loom.
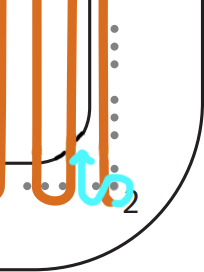
- Take the yarn up to the top-right corner and at the first group of four pins, go around the two on the left. Note that this second layer of warp lies between the yarns in the first layer. Continue wrapping back-and-forth until you reach the bottom-left corner where you started.
You should have 62 warps, with each doubled yarn counting as two ends.
Supplemental warp
- Count 14 warp ends (or 7 pairs) from the left. On the next end (the 15th), this is the first end that you will supplement with the conductive SUPP.
- Warp with SUPP as you did with the MAIN. Take the yarn back-and-forth 6 times to the right, then back again 6 times to the left. On the return, each end should lie between the ends already on the loom. You should have 12 supplemental warp ends.
Weaving Draft

Machine-readable BMP file representing the drawdown for this woven button. A larger version, readable by humans showing each thread crossing more clearly, is below.
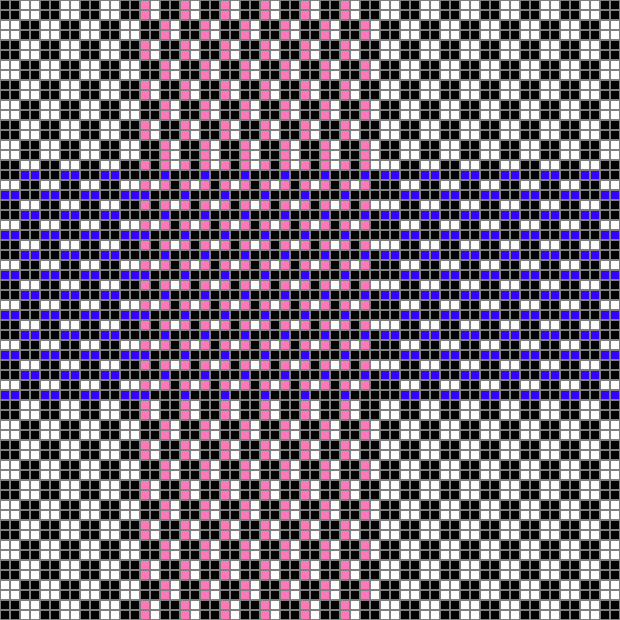
Using the Draft
- Thread a tapestry needle with the weft yarn. Start either at the top or bottom row.
- Within each row, black means that you go UNDER the warp with the weft. Any other color means that you go OVER with the weft. White means use MAIN yarn alone for weft. Blue means use the MAIN + SUPP held together for weft.
- The pink columns represent warp ends that have a supplemental end. When you come to these columns in the draft, make sure that your warp end has both MAIN and SUPP when going either over or under.